Thursday, February 28, 2013

Matte Suede Ruffian

I've never been a huge fan of the ruffian manicure. When I decided to try it I looked at a lot of pictures of different color combinations. Obviously, the combinations are endless. I came to the conclusion that ruffians can be successful if the right colors are chosen. 

For my first ruffian I used 2 coats of Essie Beyond Cozy as the base (it seems I will try to sneak this color into any mani these days). One coat of Seche Vite top coat to even things out because Beyond Cozy can be beyond bumpy. Finally, 2 coats of Julep Hailee, a matte suede. This polish was a chore to apply because it dries quickly so it can be goopy and streaky.


I was really happy with the way this mani came out and even happier with this color combination. I like the contrast between the matte and the glittery polishes.

What do you think of the ruffian manicure trend?

Wednesday, February 27, 2013

Almost giveaway time!!


Right now we are at 99 likes on Facebook!! 1 more and we'll put together a giveaway! Yes people, that means FREE stuff. Please share our blog and facebook page with your friends so we can reach our goal and have some fun with you! :)


Tuesday, February 26, 2013

Leopard + Glitter

A couple of weeks ago my sister and I bought tons of new nail art supplies from born pretty.  I was dying to use my new glitter powder and this is what I came up with.  


I used Essie's Where's My Chauffeur, this is a new color for me and I love it!!  I dipped my thumb nails in the silver/white glitter and sealed it with 2 coats of Seche Vite.  For the leopard print I painted the black semicircles with acrylic paint and a small nail art brush.  The gold glitter was a bit tricky.  I dabbed a small amount of topcoat where I wanted the glitter.  The I used a small, flat brush to press on the glitter.  I let it dry for a few minutes, swept away the excess glitter and finished off with top coat. 

 What's your favorite way to use glitter?
Monday, February 25, 2013

Oscar Ready!

Ok..I know it's a day late, but better late than never, right?

So, when I was thinking about what I would want my nails to look like if I was walking the red carpet, I knew I wanted to do something simple and sophisticated, but fun and playful.

 I chose to do a spin on a french manicure using Essie South of the Highway as the sheer base. For the tips I used Julep Kathleen and Essie Beyond Cozy. For the accent nail my intention was to make a bow (I used Zoya Aurora and outlined it in MASH white stamping polish). Obviously this looks a lot more like a butterfly. I didn't have the time to do it over and considering this was my very first time using nail art brushes, I don't think this looks half bad.


Pair this mani with an Oscar de la Renta gown and I'd be ready to go.
Saturday, February 23, 2013

Insane NAIL MAIL and haul

I think I just died and went to nail polish heaven!!!!!! 

First, I stopped at Walgreens because I noticed a lot of gals on the blogs talking about these Sinful Colors being on sale for $1. Unfortunately, they weren't, but they are only $1.99 full price. So I figured I would pick up a few anyway. (Lush Life, Fantasy, After Party, Unicorn) Who says you need to spend a lot of money to have fabulous nails?


Then the mail man came and OH MY GOD!!!!

Zoya had a promotion going on during Valentine's Day that I just couldn't pass up. The amazing blogger at  work/play/polish did a really pretty VDay nail art with these Zoya polishes:
Ali, Sweet, Carmen. If you spent $25 you got all three of these FREE!!! I mean come on...that is the greatest promo EVER!!


These were the polishes I chose to buy:
London PixieDust, Rina, Aurora


I'm really excited about my choices. I've seen them swatched and they look amazing!


In the same mail delivery came my very first Julep Maven box. HOLY CROW!!! I don't think my heart can take all of this excitement!!


How did I get so much awesomeness is one box you ask? And I only paid $9.99!! I'll fill you in on my little secret, just don't tell ANYONE! :)
I completed my online profile, but I didn't sign up. Less than a week later I got an email from Julep asking me to sign up for 50% off ($9.99) + 2 FREE polishes of my choosing! WHAT!! Another thing I couldn't pass up.

What came in my box:
Alma, Chelsea, Kathleen, Hailee (Matte Suede), Cuticle Oil


So there it is! Now I just have to figure out what I want to do first with all of this. What would you do first? 

Friday, February 22, 2013

Striped Mani

For this fun striped mani I used:  Essie Chastity, Sally Hanson Plum Luck, OPI If You've Got It, Haunt It, Revlon Bubble Gum, and Color Club Lavendarling.  I painted each nail with the light pink Essie Chastity.  Then I used a thin nail art brush to paint thin lines of all the other colors.  I clean the brush with remover mixed with water, I find it keeps my brushes nicer because it's not as harsh.  Finish off with a thick top coat to even it all out.  


The nice thing about this mani is that you don't have to be perfect.  Up close you may notice some imperfections but most people will look at your mani in awe wondering how you were able to get the lines so straight and perfect!  This mani has endless color combo possibilities, I think next time I might try some beachy blue and tan hues.
Thursday, February 21, 2013

Shiny Disco Balls

One of the products I got from Born Pretty was an assortment of hexagonal sequins or GLEQUINS. This was my first time applying these and it was easy and hard at the same time. In order for the design to look really nice, you have to place the hexagons all facing the same way. Um yeah...these thing are teeny tiny. I probably could have used a monocle or something to help me out because in the end I just started putting them on there willy-nilly.


I originally wanted a black base, but then I decided to try to match the base with color of the glequin. This is Essie Chinchilly, my favorite gray color. I'm really happy with the way this looks. Next time I'll try a contrasting effect.


This is my left hand. My right hand is just painted with no glequins. I was too tired after this hand to start on the right. I've never done that before, but something tells me this won't be the last.

Do you ever leave one of your hands naked of nail art?

Monday, February 18, 2013

Feathers & Halo Hues

This manicure was really exciting for me to do...in my head! I was so excited to get these two products: feathers and Color Club Halo Hues Angel Kiss. I decided to bring them together and this is what I came up with. I took these pictures in direct sunlight to capture the true beauty of the holographic polish.


I've seen many tutorials on how to put a real feather on your nail and let me tell you, it's a lot harder than it seems. 


I first used 2 coats of L'Oreal Not a Cloud in Sight. Then I used one coat of Color Club Halo Hues Angel Kiss. On the feathered nails I used a coat of Seche Vite then carefully laid the feather on top. After that dried, I add 2-3 more coats of the top coat. I carefully filed away the excess feather. I still have some snag areas, so I don't think this fabulous mani will last long. 

What's your favorite animal print to wear on your nails?

Thursday, February 14, 2013

I heart studs...

My obsession with studs continues.  For this mani I used OPI's Ate Berries in the Canaries.  I've had this color for a couple of years now and I still love it.  It's getting low and I may have to buy a new bottfle!  For the accent nail I used black polish and gold square studs.  It's simple but fun and I have been getting lots of compliments! 

Tuesday, February 12, 2013

I'll stab your Valentine's hearts with my Edward Scissor hands...

All I see on all the other nail blogs is Valentine's Day manis. Don't get me wrong, some of them are amazing. I'm just not feeling it for some reason. So this is my anti-Valentine's Day mani. 


My original idea for this mani was completely different BUT, my striping tape must of grew legs and took off to a sunny destination. Plan B turned out amazing! I used Illamasqua Phallic as the base color, which is a bold navy shimmer and added a spike effect using scotch tape with Essie Beyond Cozy. 


This mani makes me feel like Edward Scissorhands...haha!! 


Wednesday, February 6, 2013

Getting the hang of stamping...

I have been trying and trying to get this whole nail stamping thing down since I got a stamping kit from MASH for the holidays. I have read and watched every tutorial out there. I guess practice makes perfect. This was my best stamping yet.  Some nails came out crooked...how do all those other nail bloggers stamp so PERFECTLY???


I chose to match my base color with my stamping color because it leaves a lot of room for error. My base color is a OPI mini and I stamped with Color Club Halo Hues Blue Heaven with Mash stamp #23.   I accented my thumb nails with Ciaté Confetti.


Do you have any stamping tips for how to keep the image straight? I'd love to hear them! :) 

Monday, February 4, 2013

My cold remedy is nail polish :)

After suffering from a really bad cold for several days I decided to treat myself to some new products and I tried them out in this mani.  

I painted all of my nails in Revlon's Impulsive.  This is the perfect navy-purple polish that I've been looking for, I love it!  Then I painted all of my nails with Essie Luxeffects in Pure Pearlfection.  This is a great top coat that adds a subtle sparkle to your mani.  Check out the entire Luxeffects line from Essie.  I have a feeling I might be buying more of these lovely topcoats!  And for the accent nail I used Pure Ice Beeware silver glitter topcoat.  As you can see, this topcoat is much more blingy than the Essie topcoat.  It all came together to make a simple, wintery mani with lots of sparkle!!
Sunday, February 3, 2013

What top coat to use?

I've been asked many times, "What's your favorite top coat?"

I was recently introduced to Seche Vite (pronounced 'Sesh Veet'). I noticed that a lot of the nail bloggers I follow swear by it. 


I found it at my local CVS for $8.50. Probably more money than I usually spend on a top coat, but it's worth every penny. It dries and hardens the polish in minutes. It's miraculous!! It's also a very thick top coat, so it gives your polish a beautiful, shiny finish. I find this top coat helps your polish last longer too! 

So overall, this top coat has all PROs.

What's your go to top coat?


Friday, February 1, 2013

Nail Mail!!

My very first nail mail!! I've been dying to get my hands on an awesome holographic polish. So, I bought the BEST of course. This is last years Color Club Halo Hues collection. I can't wait to try them all!!! To be continued....


BIGGEST NAIL UPSET OF THE CENTURY!!


My sister and I are huge fans of nail stickers. So far we prefer the stickers made by Sally Hanson and the online brand Incoco. What makes these stickers so great is that they come in a vacuum sealed packaging and when you adhere them onto your nails they dry up and harden and last FOREVER it seems. These stickers are a quick and easy manicure without all the fuss.

Essie recently came out with their own line of nail stickers that I have been dying to get a hold of. After searching and searching I finally found a stocked display case at a local CVS. I had 4 styles picked out and ready to purchase. I was willing to splurge because they are so beautiful. I had the sense to check what was underneath the packaging just in case.

729429_10200099687487748_2126999689_o

Low and behold.....the stickers were sealed in regular old plastic. That means they are essentially just stickers. No matter what the box says...UV sealed yadda yadda yadda, if they are already exposed to air they won't change once you put them on your nails and they won't last for very long at all. I couldn't be more bummed. At over $10 I expected so much more from Essie. :(

537852_10151352533122485_1232906508_n
This is one of my favorite styles from the Essie sticker collection.

Winter Outside, Spring on My Fingers!

It's been so cold and grey outside lately and I decided to brighten up my life by adding some spring to my nails.  This is the first time I am trying to paint flowers on my nails and it was a lot easier than I thought it would be.  I started by painting my nails with two coats of Revlon Sheer Petal, a sheer pink.  After that was completely dry I painted on little red blobs using red acrylic paint and a thin nail art brush.

IMG_0132

Looks easy enough so far right?  Next I mixed the red acrylic paint with some white to make a pinkish-red color that is just a few shades lighter than the red.  I dabbed the pinkish-red paint in the middle of the red blobs.  

IMG_0137

Next I added tiny black dots in the middle.

IMG_0140

Then I used green to add a few leaves.  I let it dry for 5 minutes before adding the topcoat.

IMG_0144

Keep in mind when using acrylic paints that the colors get brighter and the paint smooths out once you add the top coat.  It looks really cute and was easy, even when I was painting with my left hand!  This manicure is a cute, simple pattern and I will definitely experiment more with acrylic paints and flower patterns.

Fun With Studs


Sister #2 here, all of my posts will be in blue.  You can probably already tell us apart by our different hands :)
This week I decided I wanted to incorporate silver studs in my mani.  These studs can be found on most nail art websites for pretty cheap.  Here is what I came up with:

image-3

It took some time and patience but the end result was way worth it.  I started by painting the entire nail with two coats of  Cheers by Revlon, it's a peachy pink that works for any season.  After I let that dry I used nail tape to form the line in the middle.  When you're using nail tape it's best to do it one nail at a time, at least for me.  I painted between the tape with Smokin Hot by Essie, a purplish grey color.

image-1image-2

Then I used an orangewood stick to place 3 of the silver studs along each line. They stick really well even if the polish has dried.  Finish off with some top coat and voila!  It's a fun mani that has been getting a lot of attention so far.  I see a lot more studs in my future and who doesn't love a good stud?
Looks Can Be Deceiving


On my last trip to Sephora I had in hand a hefty gift card from the holidays. I was excited to spend it ALL on nail polish. I spent some time on their website first to get an idea of what I wanted. Of course, when I got there, most of the stash I wanted was sold out. I did stumble upon a brand I had never seen before, Illamasqua.

s1449875-main-Lhero
This is a UK-based beauty brand. The nail polish colors they offer are stunning. I ended up buying 3 bottles. 2 were packaged together at $25 and the single bottles are  $14. OUCH! When I got home and used one of the polishes called Phallic (haha!), I was amazed. It glides on so beautifully and lasts a long time. Well worth the $$.

For this mani I used Illamasqua Glitterati.
728862_4977716693502_447582070_o 729037_4977720053586_1134863543_o

I guess because of the glitter it wasn't as smooth feeling as Phallic. I also didn't like this color in general. I'm a glitter girl and this just didn't glitter enough for me. In the bottle the glitter sticks to the outside of the bottle making it look a lot different from what it looks like on the nail. I would recommend this brand of polish, but maybe stay away from the glitters.

Winter Blues


Nail polish has taken over the spot in my life that shoes used to hold. I spent over $100 in nail polishes and accoutrements THIS WEEK. Obsessed!! Thankfully most of the $$ came from gift cards or I'd be in real trouble with the hubby. :) I can't go to a drug store without checking out the nail polish isle. Bed Bath & Beyond has an amazing array of nail art supplies and polishes.

image

I have been loving the Winter Blues trend along with BLING!! This mani has both...sort of.

The mani:

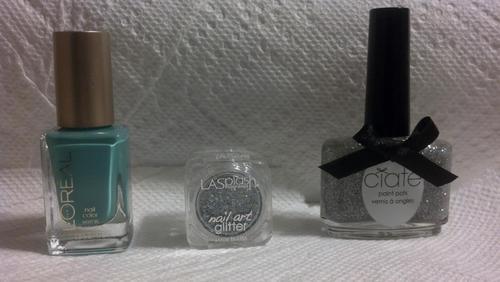
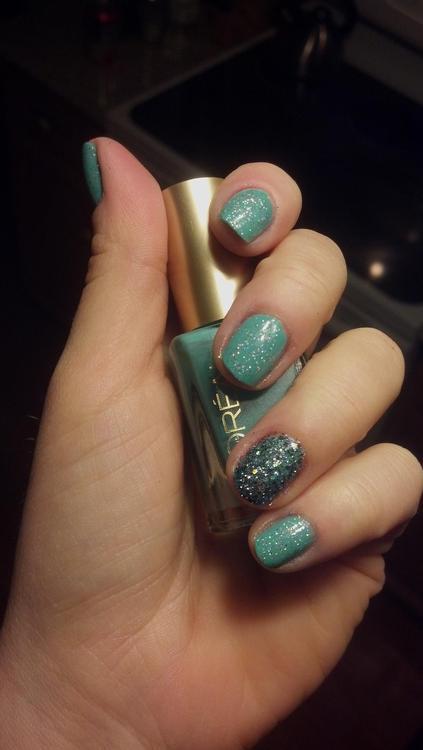
Two coats of L'Oreal Not a Cloud in the Sky. This is a color I've been looking for. It's not blue per se...but more of a blue-green. Loving it! On the accent nail, after the second coat of polish, I dipped it in nail glitter. This is my first experience with this. I thought it would be a mess, but it turned out AWESOME and with just as much BLING as I was looking for! Then I top coated the rest with Ciaté Confetti, a holographic polish (another new purchase). I really want to try this on its own too!


image

I'm totally obsessed with this mani!! I love the contrast in the glitters and just the overall wow factor of the whole thing.