Sunday, March 31, 2013

Happy Easter!!

Happy Easter to those of you who celebrate!!

My sister and I baked these amazing mini cupcakes for our family. Don't they look delicious?? We had so much fun baking and decorating together. Today we will spend the day with our extended family and EAT!!! 


I wish I had more time to do an Easter themed nail art mani, but unfortunately I didn't. I decided to use some of my NEW springy colors for this simple mani instead.


From Essie's new collection, Avenue Maintain, this creamy blue is the perfect springtime blue. It has an amazing formula and was really easy to apply. On the accent nails, I chose this limey green, L'Oreal New Money, which was not at easy to apply. It was thicker and streaky making it a bit tricky. I have a few of the polishes from this line and I'm not super happy with them. PLUS, they have a flat brush. Who ever came up with the flat brush obviously never used nail polish before. It's so big I feel like I have no control over it.  


Finally, I used my favorite topper, Essie Shine of the Times. I love this topper because it takes on the color of base that's under it.

What is your go to topper?


Tuesday, March 26, 2013

Peace and Glitter Make the World Go Round

This mani features Revlon Temptress, which is a great bubblegum pink, Sally Hanson Plum Luck, my favorite plum purple, and Essie Luxeffects Topcoat in A Cut Above, a cute pink glitter topcoat. I highly recommend the Luxeffects line. I have two colors (A Cut Above and Pure Pearlfection) from this line and love them both! I also used stars from the Sephora by Opi Nail Gems set.


I like to use 2 coats of the glitter to get an extra glittery look.  I really like the effect of the glitter topcoat on the dark Plum Luck color.  I used a nail art pen and Sally Hanson Plum Luck to paint the peace sign on my ring finger.  The gems are great because you just stick them on and seal with topcoat!  The only thing I don't like about the gems is that they are very 3-D and stick out more than I would like.  But they are cute and add a nice touch to your mani  :)  


Sunday, March 24, 2013

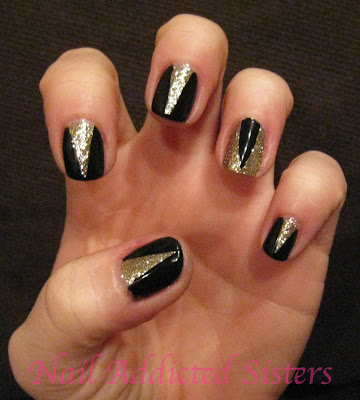
Stiletto Tutorial

Stiletto nails are STUNNINGLY BEAUTIFUL and so easy to do, PLUS the supplies you need are right in your drawer. All you need is scissors and scotch tape.


For this particular color combination, I cut out triangles from the tape.


For the accent nail, I cut strips so the negative space was opposite. Here's another look at a stiletto mani I did using only strips

My base color is Sally Hansen Complete Manicure Golden Rule. It has a clear base and can leave some bald spots, so I knew I wanted to have this as my base so the black wouldn't peek through.  I used two coats for full coverage and then one coat of Seche Vite. This ensures the polish is dry AND that the tape with not pull up the polish.

The hard part here is putting the tape on evenly and centered. I try not to go too crazy. Imperfections show that you did it yourself and that they're not nail stickers.  :)


I like to put ALL the tape on first so I don't mess up any wet polish. Make sure the tape is nice and tight up against the cuticle so the polish doesn't seep in.  After all the tape is applied it's time for the second color.

I used two coats of OPI Black Onyx, the BEST black!! I find that it's best to pull the tape off while the polish is wet. I work one hand at a time. Apply one coat, then while applying the second coat pull off the tape carefully. You should have nice neat lines!


The end result of this color combination blows my mind. Of course pictures never do the real thing justice. I have a party to go to today and I can't wait to show these sparkly babies off!!


I was going add studs to the black area of the accent nail but I thought it may be too much. What to you think? Is less more sometimes??


The best part about using tape is you can do ANYTHING! You can cut it into any shape. Try using scalloped or zig-zag shaped scissors!


Thursday, March 21, 2013

AND THE WINNER IS....

AND THE WINNER IS.....


ENTRY #418 CHRISTINA WANG!!!

CONGRATS CHRISTINA...WE HOPE YOU HAVE FUN USING ALL YOUR NEW NAIL POLISHES, STICKERS AND STRIPING TAPE!!

We've had so much fun running our first giveaway! We will definitely do another one soon. We hope all of our new followers will stick around. :) 

XOXO NAIL ADDICTED SISTERS

Christina has 48 hours to respond to my email before I choose a new winner.

Sunday, March 17, 2013

We're not Irish, but our nails are!

We're showing our Irish pride this weekend with lots of green glitter!  

I chose a green/black gradient design.  I used Forever 21's Love and Beauty nail polish (which is surprisingly nice!) in black and emerald green.  I painted all of my nails black and used the sponge method to create the ombre gradient look.  I like using eyeshadow sponges to create this design, it's much easier and neater than using the larger makeup sponges.  Here's a link to a great tutorial for this technique: Gradient nail design tutorial from Pixie Polish.  I added a slight sprinkle of emerald green glitter on the tips for some extra pizzaz. 


Erin Go Bragh!!


I chose a glitter look as well! I had been waiting for St. Patrick's Day to use my Zoya RinaIt's a stunning green glitter with some bar glitter thrown in for good measure. I found it a little difficult to apply for a few reasons: 1) it was really thick and goopy. 2) the bar glitter made it hard to apply evenly and it stuck off the top of the nail.


 For my accent finger I used Sally Hansen Complete Manicure Golden Rule. OMG! This polish is amazing. It was just the kind of gold glitter I was looking for. It looks similar to an Incoco nail sticker I once had and have been trying to find in a polish FOREVER.


I used 3 coats of both of the polishes and topped it off with 2 coats of Seche Vite. You can imagine that with all that polish this started coming off in chunks the very next day (today:( ). Oh well, just another reason to start another fabulous mani!!


Happy St. Patrick's Day everyone!! 


Wednesday, March 13, 2013

Twinsie Manis By the Pool


It's not very often that we sisters get to go on vacation together now that we're older. This week we are in Florida visiting Mom. We decided to do matching, opposite manis to post TOGETHER! How fun!

Because we're away we don't have any of our stuff, so we had to make do with what we had. Vicky was smart enough to bring some polish with her so we had some choices. 

We went with a simple accent nail since that seems to be what a lot of our new followers want to see. :) We used two beautiful Essie polishes: a favorite go to pink, Ballet Slippers and a charcoal grey, Smokin' Hot. We used a wooden toothpick to dot the accent nail. (Toothpick Tip: don't use a plastic toothpick, it just doesn't work. I tried it!)


That's me on the left, Erika, and Vicky on the right, enjoying a relaxing day in the pool! Aahhhh!!

Monday, March 11, 2013

Glitter Gradient


This was my sad attempt at a glitter gradient. My biggest issue with this mani was that my main glitter polish (Rockstar Pink) was WAY thicker than I though it was. I thought it had a sheer base, and it does, but it is so packed with glitter and REALLY thick that it can be used on its own and cover completely. Usually when I do a glitter gradient I can get away with just using the brush and not have to use the sponge technique. In the case of this polish, I should have used the sponge. 


My base color is Zoya Sweet, a perfect bubblegum pink. Then I tried to layer the Sally Hansen Xtreme Wear Rockstar Pink, a purple/pink/blue micro-glitter. To add a little extra bling, because you know I love bling, I put some OPI G-listen to Your Heart near the base of the nail, a chunky hex bright pink glitter. Unfortunately, the color of this glitter doesn't stand out enough against the Rockstar  Pink; even in the sunlight you can barely see it.


I like that this mani is sparkly and I really want to try Rockstar Pink on its own.


Friday, March 8, 2013

Putting PixieDust to the Test

When the OPI Sand collection came out I thought, "Why would anyone want their nails to feel like sandpaper??", so I never purchased any of them. Then the Zoya PixieDust collection came out and everyone was FREAKING OUT!! So I caved in and got one, London PixieDust.

I have to say, it's not as rough as I thought it would be, however, I don't love it. I just don't think I'm a texture/matte finish girl. I like my nails shiny, smooth and sparkly! :) 


Application information from Zoya website:
PixieDust Application Information -  Do not use a base coat or top coat. Apply 1-3 (for full coverage) thin coats of polish. Allow product to dry down completely matte in between layers for full textured effect. The PixieDust textured formula may take up to 10 minutes to dry completely matte. Once dry, the textured finish is long lasting, matte and ultra-glittery! 

"Ultra-glittery"- not so much. I used 2 coats for full coverage. It was nice not to have to use a base coat OR a top coat. It felt like it took 2 seconds to do this manicure without those two steps. After the polish was fully dry, I used a buffer to file the tips of my nails to file away the rough edges that felt snaggy. 


These first 2 pictures are day 1 after the manicure. I was curious how long this textured polish would last as compared to regular polish. I haven't seen many bloggers review that aspect of this polish so I thought I would test it myself.


This pic is day 2. PixieDust has held up much better than I thought it would. You can see that it has worn just a little from my pointer finger. 

I had to take it off after this because I just couldn't stand the texture any longer! I have seen these top coated and they look AWESOME, so I will definitely try that. 

Have you entered in our giveaway yet? Don't forget you can share on social networks once a day for extra entries for a better chance to win! GIVEAWAY IS HERE!


Wednesday, March 6, 2013

The Endless Possibilities of Striping Tape

This mani is an example of one of the thousands of ways you can you striping tape.  It can be tedious to apply, but the results are never disappointing.  Straight lines and fun designs, what more could you ask for?  I started with two coats of Essie Sand Tropez.  Once dry, I applied the striping tape and painted over the tape with Color Club Lavendarling.  Carefully remove the tape and voila!! 


Don't forget to enter our awesome giveaway HERE and you can win some striping tape and create a cool design like this!

Monday, March 4, 2013

You Can Never Have Enough Glitter!

I never knew how much I LOVED blue nails. And boy are these BLUE! 


I started with 2 coats of Nails Inc. Baker Street and layered another 2 coats of Sinful Colors After Party. I was hoping to layer 2-3 coats of just After Party, but it didn't have the opacity I was looking for.  


This glitter polish is beautiful!! It has tons of micro-glitter, small circles and some large circles too! I used one coat of Seche Vite top coat. On a couple of nails the large circles were poking out a bit so I added a second coat and that did the trick.


Don't forget to enter our awesome giveaway HERE featuring some Sinful Colors polishes. :)


Friday, March 1, 2013

100 Facebook Likes Giveaway!!!


~~Nail Addicted Sisters 100 Facebook Likes Giveaway~~

We want to thank all of our awesome followers, so we put together this fun giveaway with an assortment of goodies. Good luck!!